Manually entering invoices into Xero works when you only have a few, but as the volume grows, it quickly becomes overwhelming. If you’re stuck typing invoice details one by one, you’re not just wasting time you’re increasing the risk of costly errors that can throw off your financial records.
Dealing with dozens or even hundreds of invoices manually is inefficient and prone to mistakes. Incorrect amounts, duplicate entries, and formatting errors can lead to reconciliation issues and missed payments.
Instead of spending hours on data entry, you need a way to speed up the process while ensuring accuracy. In this guide, you’ll learn how to import invoices into Xero without manual entry.
Step 0: Digitalize Invoices (For Paper Invoices)
If your invoices are in paper format, the first step is to convert them into digital files. A high-quality scan ensures accurate data extraction. Use a scanner to create a clear, high-resolution PDF for the best results.
To enhance OCR accuracy, keep the document clean, scan it straight to avoid misalignment, and use a high-resolution setting. Properly digitized invoices make data extraction smoother, reducing errors when converting PDFs to CSV for Xero.
Step 1: Capture Invoice Data
Once your invoices are in digital format, the next step is to extract their data for import into Xero. Instead of manually entering details into a spreadsheet, DocuClipper automates the process, capturing key invoice details quickly and accurately
Using DocuClipper eliminates the need for manual data entry. It extracts key details such as vendor name, invoice date, invoice number, line items, amounts, tax, and quantities, ensuring all required fields are properly captured.
How to use DocuClipper:
- Open DocuClipper in your web browser and navigate to the invoice OCR section.
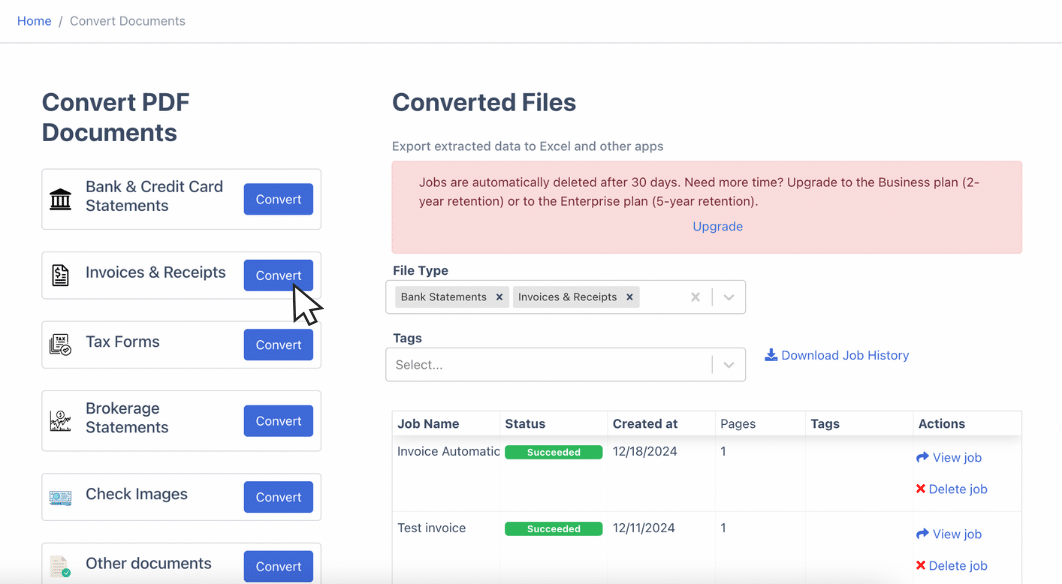
- Drag and drop one or multiple invoices into the platform.
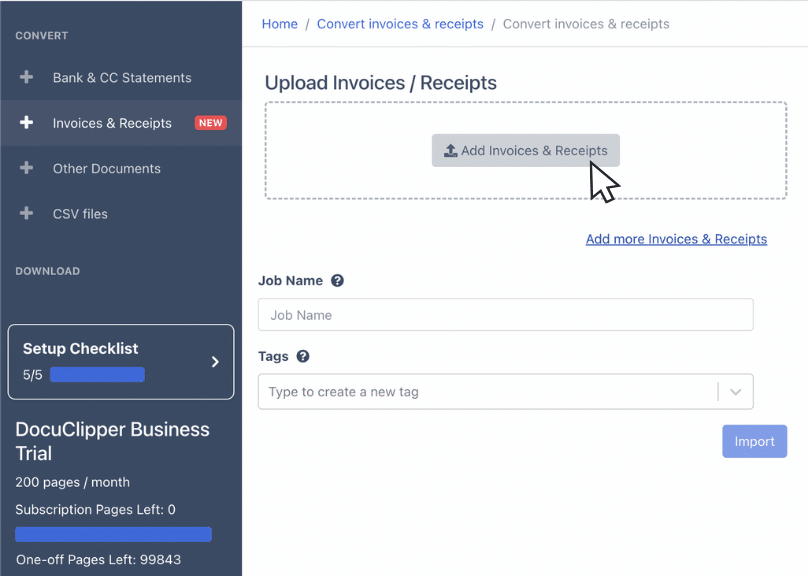
- DocuClipper extracts invoice data automatically, regardless of the invoice format.
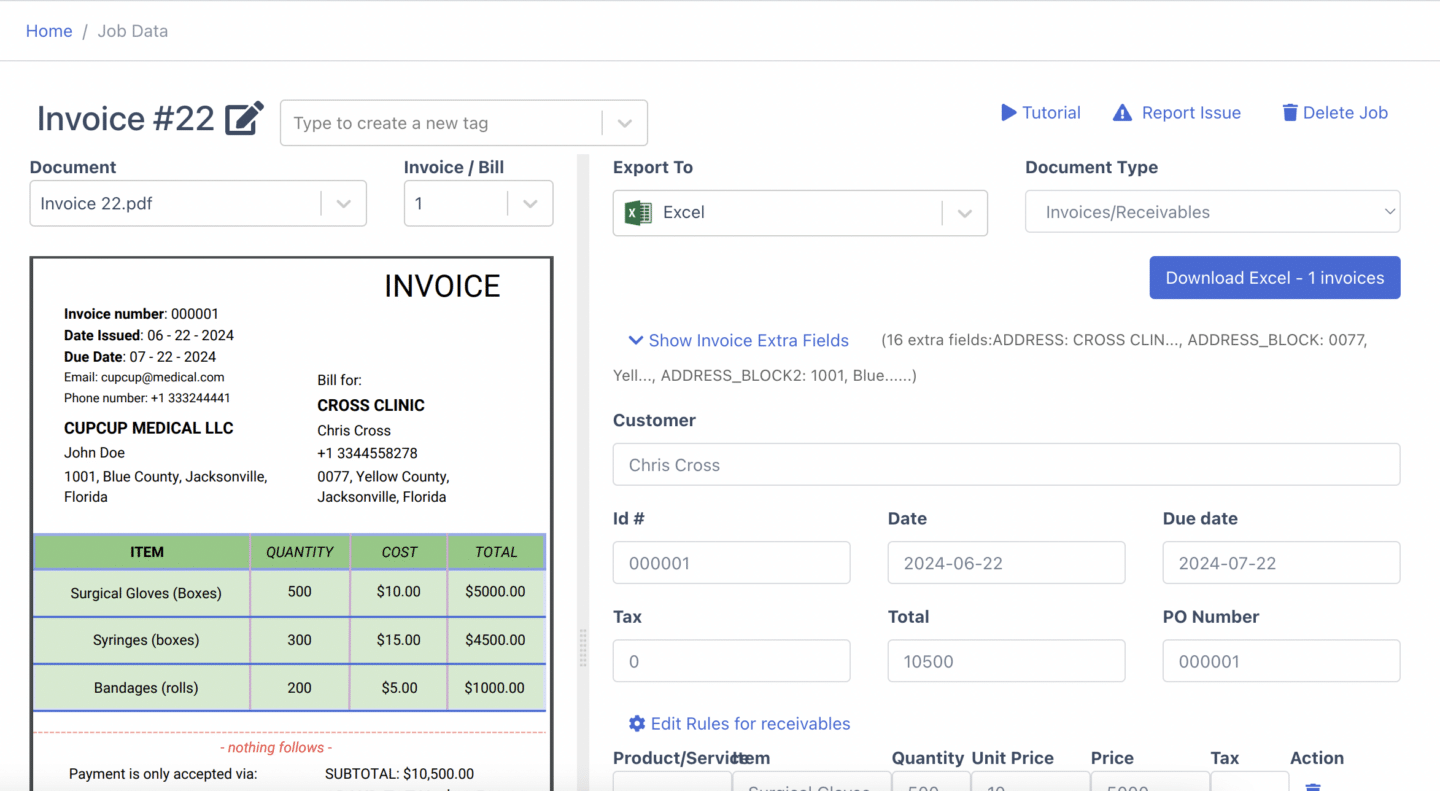
- Review the extracted line item details and make any necessary modifications.
By using DocuClipper, you receive a structured, Xero-compatible CSV file without manual effort, reducing errors and saving hours of work.
The Manual Alternative (Not Recommended)
Manually entering invoice data is time-consuming and prone to errors. You would need to open a spreadsheet, input vendor details, invoice numbers, amounts, and tax manually, format the data according to Xero’s requirements, and then save it as a CSV before importing.
This process is inefficient, as manual data entry has an average error rate of 4%, which can lead to costly mistakes. Processing a single invoice manually can take up to 30 minutes, making it an impractical option when handling large volumes of invoices.
Automating with DocuClipper ensures speed, accuracy, and efficiency, allowing you to focus on higher-value tasks instead of spending hours on data entry.
Step 2: Export the Invoice Data Into Xero Compatible CSV File
Once the invoice data is captured and reviewed, the next step is to export it in a format that Xero can process.
With DocuClipper, this is straightforward. After uploading and verifying invoice data, go to the export section and select CSV as the export format.
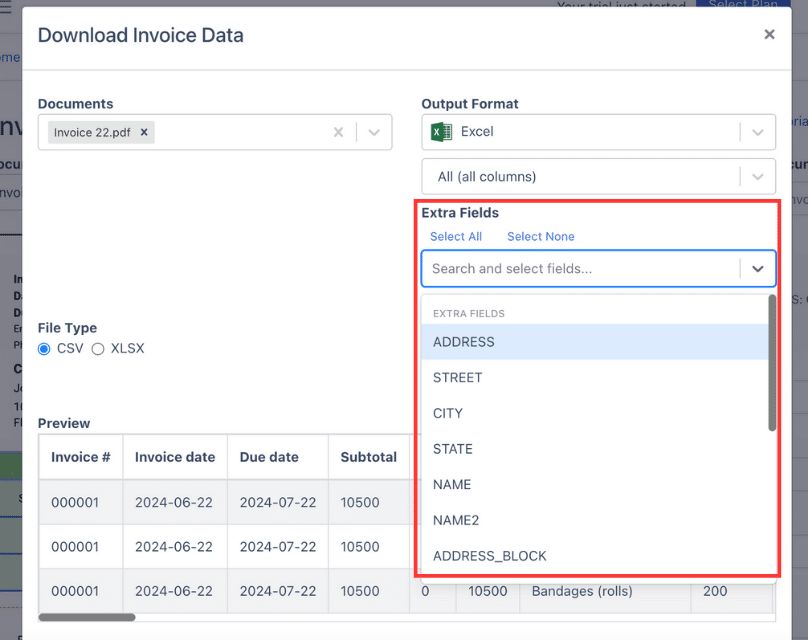
Since Xero has a recommended column format, you can adjust the column structure within DocuClipper before exporting. If necessary, add or edit fields to ensure they align with Xero’s import requirements. This eliminates the need for manual formatting after the CSV is generated.
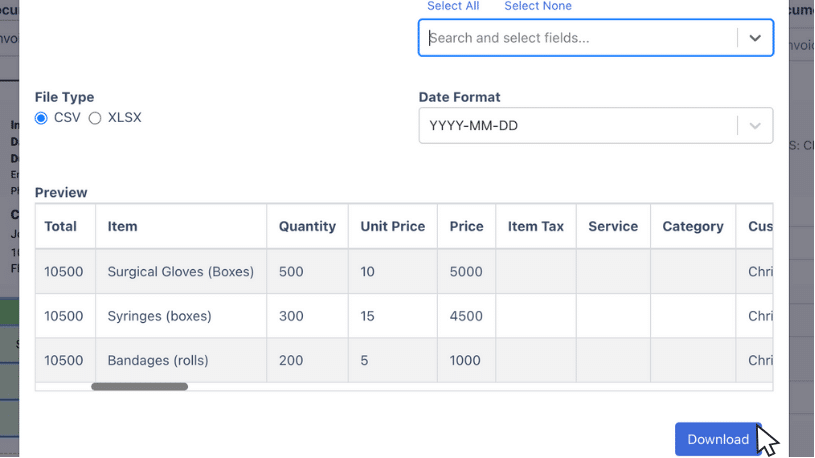
Once everything is in place, download the finalized CSV file. After exporting, you are ready to import the invoice data into Xero.
Step 3: Import Invoice Data Into Xero
Xero Invoices – How to Bulk Import Invoices into Xero
Once your invoice data is extracted and formatted by DocuClipper, the next step is importing it into Xero. Since the CSV file is already structured correctly, the process is straightforward.
1. Access the Import Function
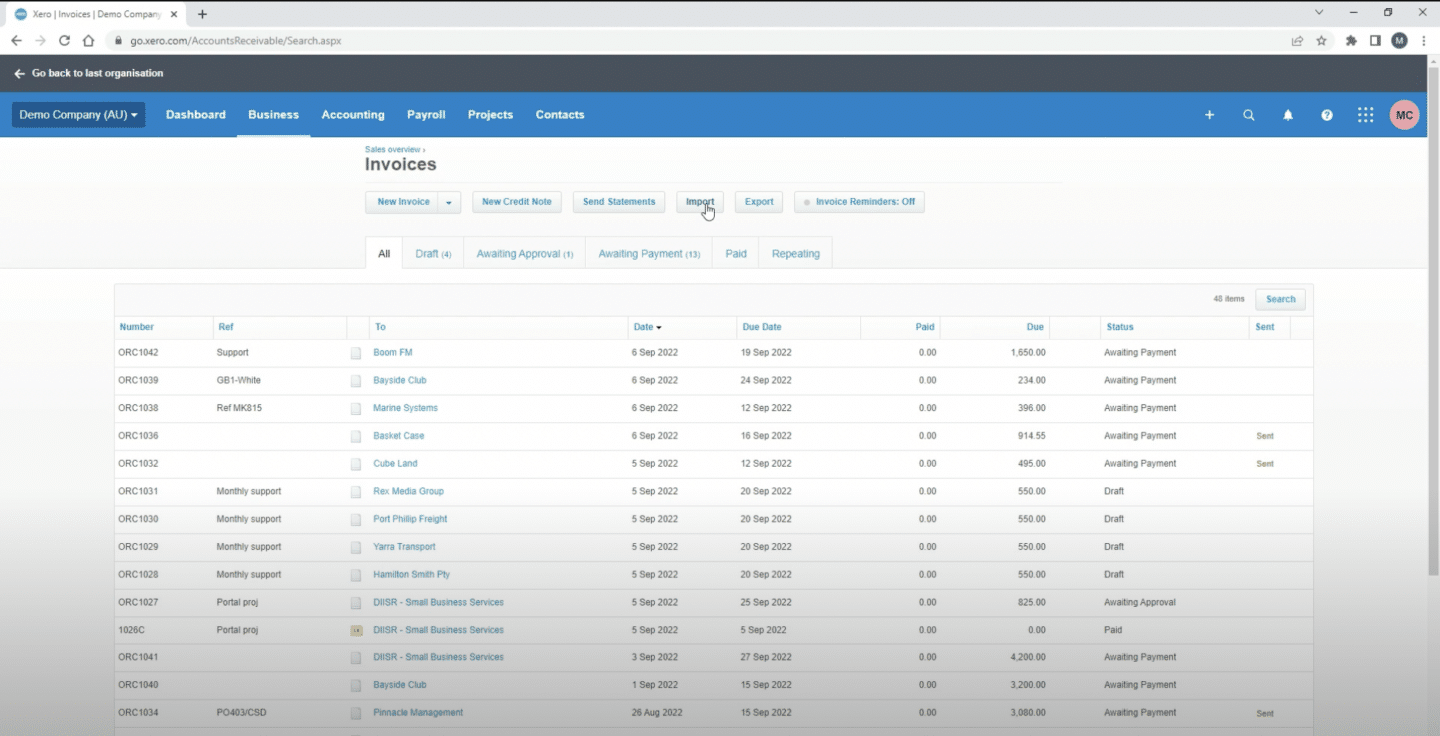
Open Xero, go to the Business menu and select Invoices. Click Import to begin the bulk upload process. This will take you to the invoice import screen, where you can upload a CSV file.
2. Upload the CSV File
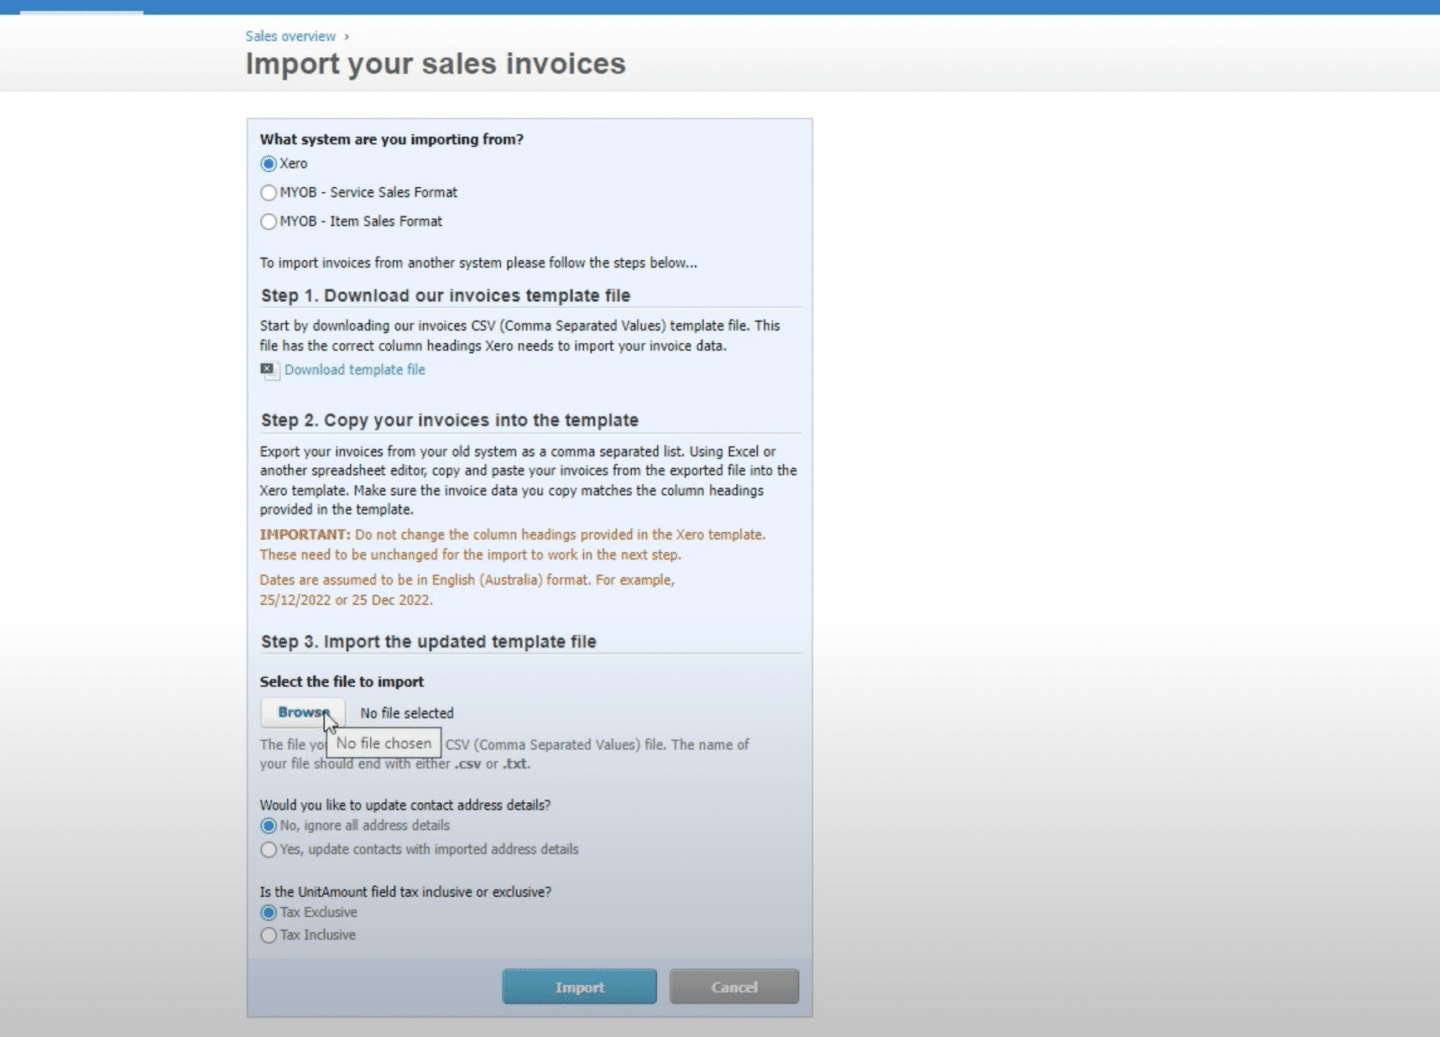
Click Browse, select the DocuClipper-generated CSV file, and upload it. Once selected, click Next to proceed. Xero will scan the file and attempt to map the data fields automatically.
3. Review Field Mapping and Data Formatting
Check that Xero correctly matches the fields from your CSV. Ensure:
- Contact Name is correctly assigned to existing contacts in Xero. If a contact doesn’t exist, Xero will create one automatically.
- Invoice Number is unique. If the number already exists, Xero may skip the entry.
- Invoice Date and Due Date are formatted correctly.
- Line Items and Amounts are structured properly, ensuring multi-line invoices retain their correct format.
- Account Codes and Tax Rates match Xero’s Chart of Accounts.
If any fields are mapped incorrectly, adjust them before proceeding.
4. Confirm the Import and Resolve Errors
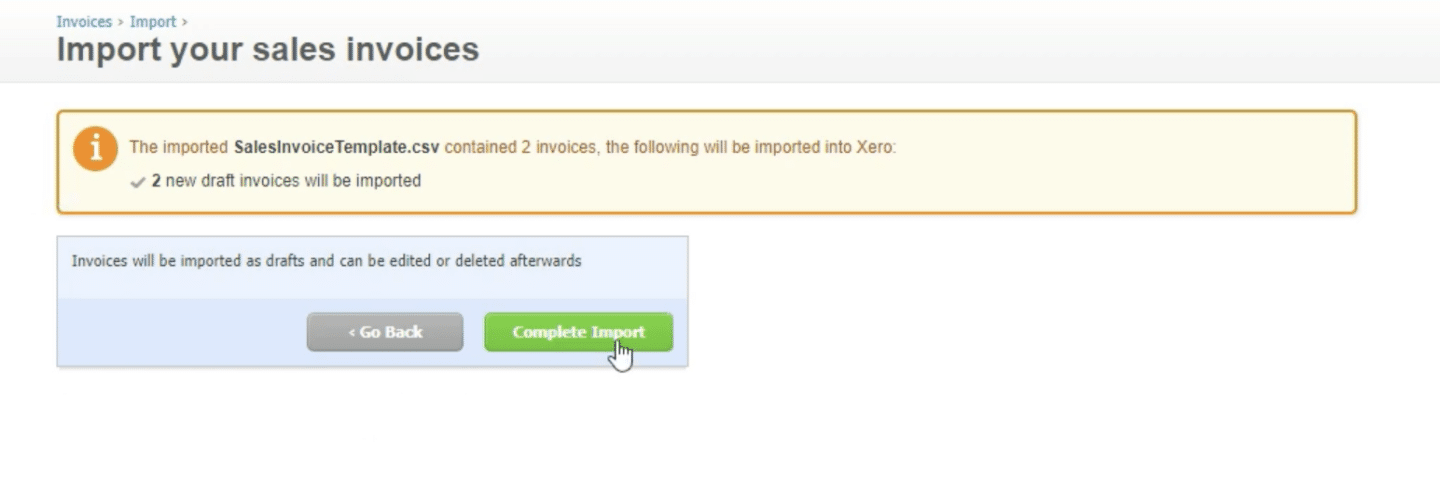
Click Complete Import to process the invoices. If Xero detects missing fields, incorrect formatting, or duplicate invoice numbers, it will display an error report.
If errors appear, make corrections in DocuClipper, re-export the CSV, and re-upload it.
5. Verify Imported Invoices
Once the import is successful, navigate to Business > Invoices and review the imported invoices in the Drafts section. At this stage:
- Check that all invoices have been imported with the correct amounts, line items, and tax rates.
- Apply branding themes if necessary.
- Approve invoices for processing.
Once verified, invoices can be finalized and included in financial reports.
- How to Import invoices into QuickBooks Online
- How to Import Invoices into Zoho Books
- How to Import Invoices into Dynamics 365 Business Central
- How to Import Invoices into SAP Business One
- How to Import Invoices into Sage
- How to Import Invoices into FreshBooks
- How to Import Invoices into NetSuite
How DocuClipper Automates Importing Invoices Into Xero
Manually entering invoice data into Xero is slow, error-prone, and inefficient, especially when handling a high volume of invoices. Instead of spending hours manually typing invoice details, DocuClipper extracts invoice data automatically and converts it into a Xero-compatible CSV file in seconds.
With DocuClipper, you can upload multiple invoices at once. The system accurately captures key details such as invoice numbers, dates, vendors, line items, and totals. The CSV output is fully customizable, allowing you to match Xero’s required column format without extra manual adjustments.
If you prefer to work with a spreadsheet, DocuClipper can also convert PDF invoices to Excel.
Because of its high OCR accuracy, DocuClipper eliminates typos and data entry mistakes, ensuring that invoices are imported correctly the first time. Instead of wasting time on repetitive tasks, you can focus on more important work
FAQs about How to Import Invoices into Xero
Here are some frequently asked questions about how to import invoices into Xero
How do I bulk import invoices into Xero?
To bulk import invoices into Xero, go to Business > Invoices, then click Import. Download the CSV template, fill in invoice details, and upload the file. Ensure the format matches Xero’s requirements to avoid errors. Once imported, review and approve the invoices in Xero.
Can I import a CSV file into Xero?
Yes, you can import a CSV file into Xero. Navigate to Business > Invoices or Contacts, click Import, and upload your CSV file. Ensure the file format matches Xero’s template to avoid errors. After uploading, review and confirm the imported data.
Can I import transactions into Xero?
Yes, you can import transactions into Xero. Go to Accounting > Bank accounts, select a bank account, and click Import a statement. Upload a CSV, QIF, or OFX file with properly formatted transactions. After importing, reconcile the transactions in Xero.
Can you import old data into Xero?
Yes, you can import old data into Xero. You can upload historical invoices, bills, bank transactions, and contacts using CSV files. Go to Settings > Import to access import options. Ensure your files match Xero’s format for accurate data transfer.
Can you import a bill into Xero?
Yes, you can import a bill into Xero. Go to Business > Bills to pay, click Import, and upload a CSV file using Xero’s bill template. Ensure the format matches Xero’s requirements to avoid errors. Once imported, review and approve the bills.
Can I import Excel into Xero?
Xero does not support direct Excel file imports, but you can convert your Excel file to a CSV format and then import it. Ensure the CSV matches Xero’s template before uploading it through the Import function under the Business or Accounting sections.
